
With QC Approvals, you can create and manage approval templates for your Confluence pages. Before your pages are ready for approvals, you will need to set up the templates and configure the approval settings.
Approval templates are available in Apps → Site Admin → Templates. In this table, you can create new templates, edit existing ones, and disable the ones you no longer need.
Each approval creation form contains the following fields:
-
Basic Information,
-
Signers,
-
Notifications
Creating an Approval Template
To create an approval template, follow the steps below:
-
From the left sidebar, click on “Apps” and select the “Site Admin” option,
-
Navigate to the “Templates” tab and click the “Create Template” button,
-
Give your template a unique title to easily recognize it. Optionally, you can also type a description.

-
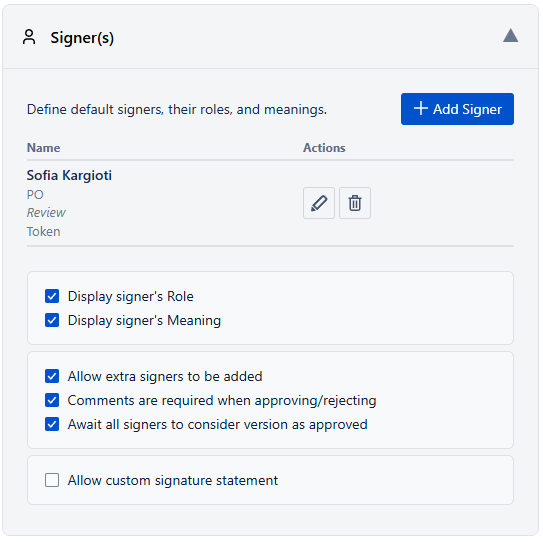
In the “Signer(s)” field, click the “Add Signer” button. In the dialog that pops up, search and select the user, define their signature meaning and signature type, and give them a role.
-
Click “Add” to add the signer to the template. To add multiple signers to a template, follow Steps 4 and 5 as needed.
-
Some additional details that you have to configure while creating a template are:
-
Display signer’s Role and Meaning: If this option is enabled, then the signer’s role and meaning will be visible in their signature details through the QC Approvals app’s interface.
-
Allow extra signers to be added: Depending on your workflow, you may want to add additional signers to specific pages without having to create a new template. Leave this option enabled when configuring your basic signers, so that when you add the template to a page, you will be able to add new signers.
-
Comments are required when approving/rejecting: This option ensures that all signers will leave a comment with their feedback, regardless of whether they have approved or rejected the page version.
-
Await all signers to consider version as approved: The version status will remain PENDING until every signer has signed it.
-
Allow custom signature statement: Depending on your workflow, you might want a different message displayed in the Signature macro when a user is signing the version. Enable this option and add your custom message.
-
-
Enable automated reminders based on a specific interval according to your workflow. The available options are:
-
Every week on a specific day (e.g. every week on Monday, every week on Wednesday, etc), or
-
Every month on a specific date (e.g. every month on day 1, every month on day 12, etc).
-
-
Send email notifications to signers: leave this option enabled to notify all signers of their pending approvals every time the template is added to a page, or every time a new major version that requires approval is published.
-
Send email notifications to additional users: enable this option to send a notification to a manager or to the person responsible for version approvals.
-
Click “Save” to publish the template in your Confluence instance and make it available for use.
Adding an Approval Template to a Page
Here is how to use approval templates when your pages are ready to be signed.
-
Go to your page and click the three dots (More actions) in the upper right corner.
-
Click on “Apps” and select “QC Approvals”.
-
Enable page approvals by moving the toggle to "Enabled".
-
From the dropdown, select the template you want to use and click “Save”.

Once you’ve configured the approval template, you will also have to configure the page version for approvals. To do this:
-
Click the three dots (More actions) in the upper right corner.
-
Click on “Apps” and select “QC Approvals”.
-
Navigate to the “Version Control” tab and locate the version that needs approval
-
Give this version a unique alias, a reason for change (optionally), and change its type to “Major”.
-
Now, the signers you’ve already defined in the template are assigned to the page.